The dust collector itself is only one part of an efficient dust collection system. An airtight and optimized ductwork layout is essential to maximize your shop's performance. Oneida Air Systems has put together a guide designed to provide a basic understanding of dust collection airflow and the components required to successfully complete an entire ductwork installation. Each section of this blog series will take you through the processes of preparing, assembling, and connecting your ductwork.
Once you have begun your ductwork layout, you can start to assemble your Standard Ductwork.
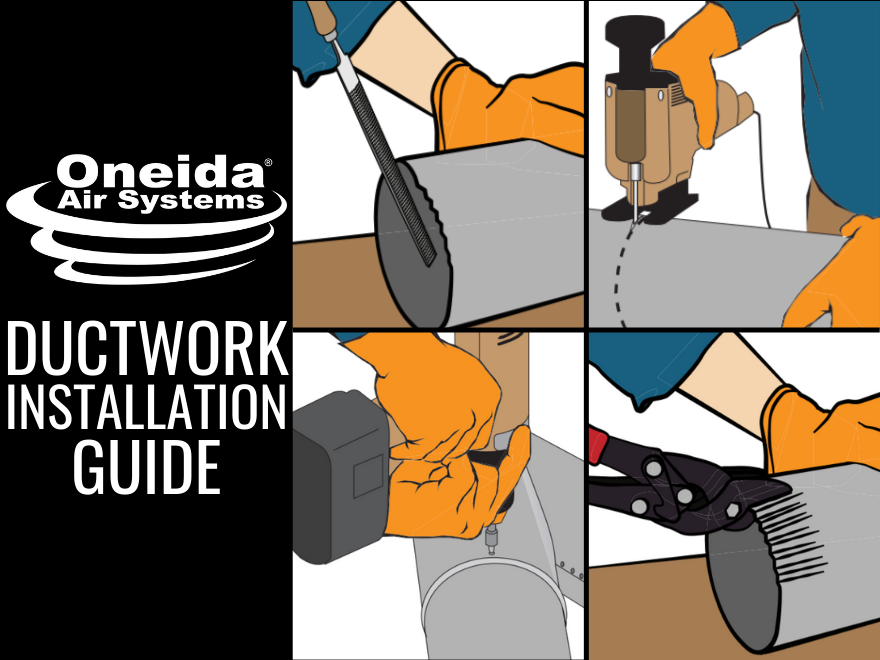
Cutting Snap-Lock Pipe
Depending on your installation, you may need to cut your snap-lock ductwork to fit into your layout. To do so, first measure the distance you want to span, marking all around the pipe. Then cut along the line that you drew, peeling back the sheet metal as you cut. To make removal easier, either cut off sections as you continue or rotate the duct around to start on the other side. Once you're done cutting, be sure to file and/or deburr the sharp edges so that there are no rough parts that could grab or snag airborne dust and debris.


Crimping Snap-Lock Pipe
Oneida will pre-crimp any ordered ductwork at your request. Crimping ductwork will reduce the overall diameter by roughly 1/8".
If you need to crimp your ductwork on site, first ensure that the side of the hand crimper with the most blades is on the outside. Then, press the crimpers firmly down, repeating around the circumference of the pipe.
For proper airflow performance, the crimped ends of the ductwork must be pointed in the direction of the airflow (i.e. towards the dust collector).


Assembling Snap-Lock Pipe

Begin by using a flathead screwdriver to open up the lip of the seam.

Start at the crimped end and work the seam together like a zipper. Hold together with one hand (or with large rubber bands) and move down the pipe as the seam snaps together.

When you get halfway, it should snap fully closed.

After joining the ductwork together, secure it using either Pop Rivets or #8 x 1/2" Sheet Metal Screws. Be sure to secure it in place at a minimum of four locations.
Seams that run the length of the straight snap lock pipe do not need sealing. If you make a mistake and have to dismantle a pipe, gently drop flat on the ground, seam side up. It should pop right apart.
Sealing Snap-Lock Ductwork
All connections, joints, and seams on your ductwork should be fortified and sealed. All of the joints on adjustable elbows should also be sealed after installation. Remember that even small cracks create significant air loss. Well sealed ductwork will ensure you have maximum air available at your woodworking machine where it is needed. Please note that aluminum foil tape has very sharp edges; always wear work gloves for safety.

Use adhesive-backed aluminum tape to seal the ductwork, cutting strips long enough to circle the joint at least twice.

As an alternative non-permanent sealing method, we recommend using silicone sealant on the outside of connections so that your ductwork can be disassembled if needed.
Adding Wye Joints
To ensure proper airflow performance, Wye Joints must be oriented so that the branch segment is pointing off and away from the direction of airflow (i.e. do not point the branch "jackknifing" back towards the dust collector).

Adding a Saddle Tap Wye
First, lay the Saddle Tap Wye in the correct orientation (pointing away from the direction of airflow) and trace the egg shape onto the pipe from inside the branch.


Next, drill a pilot hole using a stepped drill bit to create a starting place for cutting.

Cut out the shape that you drew and peel the sheet metal back as you cut. Once cut, be sure to file and/or deburr the sharp edges so that there are no rough parts that could grab or snag airborne dust and debris.

Lay the Saddle Tap Wye onto the pipe and align the branch with the hole that you cut. If it's not aligned properly, the airflow efficiency will significantly decrease at the branch.

Secure the Saddle Tap Wye to the pipe in a minimum of four locations with self-tapping screws or pop rivets, starting with the end at the bottom of the egg shaped hole. Use silicone or adhesive-backed aluminum tape to create an airtight seal.

Adding a Clean Out

To add a Clean Out, first lay it on your pipe in the desired location. Then open the Clean Out, and trace the inner oval shape onto your pipe

Drill a pilot hole using a stepped drill bit to create a starting place for cutting, and cut out the shape that you drew.

Peel the sheet metal back as you cut. Once cut, file and/or deburr the sharp edges to ensure that there are no rough parts that could snag airborne debris.

Lay the Clean Out back onto the pipe and align it with the hole you cut. Secure it in place with self-tapping screws or pop rivets, and use silicone to create an airtight seal.
Sealing the Main Line
You can seal off the Main Line of your ductwork assembly using an End Cap. Simply push the End Cap firmly into the open pipe end, then secure it in place using Foil Tape.

What's Next?
Looking for more help with your ductwork installation? All of our large ductwork orders and ductwork kits now include a copy of our complete Ductwork Installation Guide, which goes into detail on each step of the process.